The Main Page
After you enter the correct userid and password, you will come to the main page of the Meetings/Events program. At the top of the page (beneath your logo) is a row of buttons that perform the tasks of the program: Manage Meetings/Events, Manage Facilities, Email Registered Users, Manage Groups, Select Users and Configure.

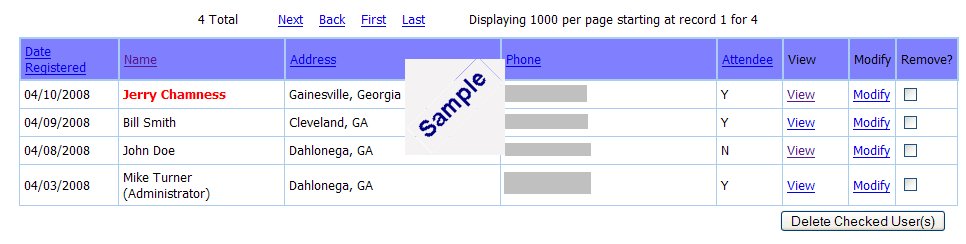
Following the buttons, you see a list. In this case, the list will be a list of users who have registered to use the Meetings/Events program. Of course, in the beginning, the list will be empty.
Throughout the program, you will see lists. In addition to the list of users, there will be a list of scheduled Events, a list of Facilities available for the events, and other lists. All these lists operate in the same way. (you may consider a list to be a table of data.) At the top of the list is a colored line which contains the name of each field in the list. For example, here on the Users List, you see: Date Registered, Name, Address, Phone and Attendee. These fields will be described below. You also see a View, Modify, and Remove link on each item.
The View link will always show you more details about the item. The Modify link will allow you to change/edit the item, while the Remove checkboxes offer you the ability to remove item(s) from the list.
Notice also that there is a line above all lists that reads something like: 4 Total Next Back First Last Displaying 50 per page starting at record 1 for 4
This simply gives you some statistics about the list you are viewing and have to navigate it. If there are more items on the list than 50 (which is a configureable number), the list will be shown on multiple pages. Say you are using 50 lines per page, and you have 500 users signed up. That means there will be a total of 10 pages of users. You navigate the pages by using the Next, Back, First and Last links. (You can also use the Select button to select which users you wish to see in the list.)
Fot this particular list which is Users, we see the date they signed up, plus their name, address and phone number. On the registration form is a question that asks if they are an attendee of your church. Thus, the Attendee field lists how they answered that question.
Now, note that some of the titles in the colored bar at the top are actually web links. What happens when you press these links? The columns will be arranged in sorted order, according to the link you pressed. For example, if you press the Name link, the items in the list will appear in sorted order by (Last) Name. Similarly, if you press the Phone link, the list will be displayed in sorted order by telephone number.
For the Users List (and for most other lists in this program) you will see a button that says "Download Users Report" at the top of the list. By presing this button, you can download an Excel file (actually, a comma-separated values file that opens into Excel) which lists all the data about the users.
Some information in the lists may be bolded and colored. For example, in the Users List, a name may appear in bold red. This means that the user has not verified his/her registration. We will find other places in this program where fields are marked in this way, most notably the Events list.
Now, what happens when you press the View link next to an individuals' name? Here's an example of what you will see:
| Name: John Doe (Username: john, Password: doe)
Regular User Email Me: johndoe@caaministries.org |
This gives you a complete screen with all known info about the user.
What happens when you press the Modify button? This gives you a view of the exact same input form that the user filled in, when signing up. See Login/Signup. This allows you to edit/change the users' information, as you wish.
OK? So how do you add an Event to the calendar? Or edit an event that was entered previously?