Sundial Setup and Configuration
After logging in to the administration control panel, you will see a button labeled "Configure." Once you press that, you will come to a page where the program can be customized for your church.
On the left side of the page you will see five buttons.
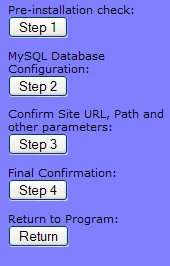
The first two - Step 1 and Step 2 - have been pre set by CAA Ministries and should not be changed. At any time you may always just click the "Return" button to return back to the program without making any changes.
You will need to click on the Step 3 button to setup your personal preferences. Within Step 3, you should review each field and make your preferred changes. Located next to each field, you will find a small blue dot containing a question mark. Click on the question mark for help with what needs to be entered and how it will affect the functionality of your program.
There are five sections of the configuration on this page:
Program Preferences
Here is where you enter your name (as the program administrator) and email, and your passcodes. Your name and email address will be whenever emails are sent to the registered users of the Meetings/Events system. You will need your passcodes in order to login as adminstrator.
Email Notifications
The program can send you notifications whenever an event is paid for, or whenever a user registers. If you would rather not receive such notifications, here is where you can turn them off (or back on.)
Payment Options
Here is where you select how users can pay for events they would like to attend, (if required.) The ususal options are payment by credit card (using Paypal as the credit card processor) and payment by check. But you can add your own payment processors, if you have any. (If you're not sure what this means, you can safely ignore it.) Now, notice the last option in this section: When adding events, do you want to be able to select which mix of payment options to offer for each particular event?
When adding an event, the Add Event form would usually not list the payment options available, as that happens on the Register page, using all the payment options setup in this configuration.
However, if you'd like to enter different payment options for each individual event, as the event is being added in the Add Event screen, then set this option to y.
Example: Garage Sale event could be setup to pay only by check. While a Concert event could be setup to be paid by credit card only.
Control Panel Options
These options control how the program behaves. It's wise to select your timezone as this affects all the dates of your calendar entries. And the default apearance of the Calendar is OK. But you can select it to appear with different color styles, or as a Text List instead of a Wall Calendar.
Event Approval
Please enter the names and email addresses of all persons who must approve an event before the event will be added to the Master Calendar.
If you have several people in different departments who must all approve an event before it can be added to the calendar, here is where you enter those names and email addresses. Each one will receive an email with an approval link in it that must be clicked. Not until all have received their emails and all have clicked the approval link will the event be scheduled.
When adding events, do you want to be able to select which approvers to approve the event?
When adding an event, the Add Event form would usually not list who can approve an event, as it would usually use all the people who are configured as those who must approve the event.
However, if you'd like to enter different approvers for each individual event, as the event is being added in the Add Event screen, then set this option to y.
Example: you have a list of 3 approvers (from the Event Approval section in the configuration.) George Smith, Fred Allen, and Lucy Ricardo. If this option is checked, then the Add Event screen will list all 3 with check marks next to them. If only Lucy Ricardo is checked, then only she will be sent an email to approve the event.
Finishing the Configuration
Once you make the needed changes in step 3, you will always need to scroll to the bottom of the page and click the Step 4 button. When this button is clicked, it will open for review a list of all of your entered preferences. (NOTE: We recommend you print this page and save it for future reference if needed)
Next, simply click the button at the bottom of the page that reads "Configure Program".
You will see a Status (or informational) page that lists the results of the configuration. Note that it repeats what your userid and password is. Please write this down or remember it somehow. You cannot run the program without them.
Then press the button labeled "Start the Program" and you're done with this part of the configuration.